# Tie-Up Functions
### What It Does
The Tie-Up menu provides operations for manipulating the tie-up matrix — the grid that connects shafts to treadles. These operations let you transform the tie-up in various ways: clearing, inverting, rotating, flipping, and shifting. There's also a Diagonal button for generating stepped tie-up patterns.
***
### Location
* **Ribbon**: Design tab > Tie-Up dropdown menu
* **Right-click**: The tie-up area also offers these operations in a context menu
***
### Operations
To select the entire tie-up, first bring it into focus by either clicking inside the tie-up area or pressing **Tab** until a thin green outline surrounds the tie-up box. Then press **Ctrl + A**, or choose **Select All** from the Home menu.
To select a portion of the tie-up, press **A** on the keyboard or choose **Select** from the Home menu. Then drag to select the desired area of the tie-up.
Once the area is selected, click any of the options under **Tie-Up** to apply your changes. These same options can also be accessed by right-clicking within the tie-up box.
#### Clear
Removes all connections in the tie-up (or in the current selection if one is active). Every cell becomes empty — no shafts connected to any treadles.
#### Change Face
Toggles every cell in the tie-up: filled cells become empty, and empty cells become filled. This swaps which shafts are raised and which are lowered for every treadle, effectively showing you the other side of the fabric.
| Original Selection | After Change Face |
| ---------------------------------------------------------------------------------------------------------------------------------------------------------------------------------------------------------------------------------------------------------- | ---------------------------------------------------------------------------------------------------------------------------------------------------------------------------------------------------------------------------------------------------------- |
| | |
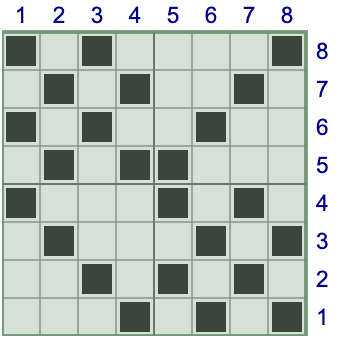
#### Invert & Reverse
**Invert** Flips the tie-up vertically (top to bottom). The top row moves to the bottom and the bottom row moves to the top. This reverses the shaft order within the tie-up — shaft 1's connections swap with the highest shaft, shaft 2 with the next highest, and so on.
\
**Reverse** Flips the tie-up horizontally (left to right). The leftmost treadle column moves to the right and vice versa. This reverses the treadle order.
| Original Selection | After Invert | After Reverse |
| ---------------------------------------------------------------------------------------------------------------------------------------------------------------------------------------------------------------------------------------------------------- | ---------------------------------------------------------------------------------------------------------------------------------------------------------------------------------------------------------------------------------------------------------- | ---------------------------------------------------------------------------------------------------------------------------------------------------------------------------------------------------------------------------------------------------------- |
| | | |
| | | |
#### Rotate 90 and 180
**Rotate 90** rotates the tie-up 90° clockwise. This requires a square selection (same number of shafts and treadles in the selection). If the tie-up isn't square, select a square region first.
**Rotate 180** rotates the tie-up 180° — equivalent to applying both Invert and Reverse. Every cell moves to the diagonally opposite position.
| Original Selection | After Rotate 90 |
| ---------------------------------------------------------------------------------------------------------------------------------------------------------------------------------------------------------------------------------------------------------- | ---------------------------------------------------------------------------------------------------------------------------------------------------------------------------------------------------------------------------------------------------------- |
| | |
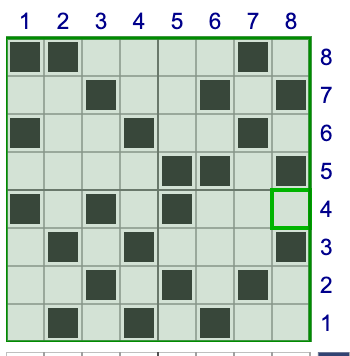
#### Shift Right / Shift Left
Moves all tie-up connections one column to the right or left. Connections that shift off the edge wrap around to the opposite side. Hold Shift when clicking to shift without wrapping (connections at the edge are lost instead).
#### Shift Up / Shift Down
Moves all tie-up connections one row up or down. Connections that shift off the edge wrap around. Hold Shift for no-wrap mode.
| Original Selection | After Shift Right (with wrap) |
| ---------------------------------------------------------------------------------------------------------------------------------------------------------------------------------------------------------------------------------------------------------- | ---------------------------------------------------------------------------------------------------------------------------------------------------------------------------------------------------------------------------------------------------------- |
| | |
***
### Diagonal Button
The Diagonal button (separate from the dropdown) generates a stepped diagonal pattern across the tie-up. It opens a dialog with these settings:
**Start** Which treadle to begin the diagonal pattern from.
**Step** How many shafts to step per treadle. A step of 1 creates a simple diagonal (1-2-3-4). A step of 2 skips every other shaft (1-3-5-7).
**Treadles per Cycle** How many treadles make up one complete cycle before the pattern repeats or extends.
**Stop** The last treadle to fill with the diagonal pattern.
**Direction** Step up (shaft numbers increase) or step down (shaft numbers decrease).
If you have a selection in the tie-up, the diagonal is constrained to that shaft range.
***
### Tips
* **Undo works** — Ctrl+Z (Cmd+Z) reverts any tie-up operation.
* **Use with selections** — If you select a region of the tie-up first, operations apply only to that region. This lets you transform part of the tie-up while leaving the rest unchanged.
* **Change Face for the flip side** — Change Face is the quickest way to see what the back of your fabric looks like — it inverts the entire interlacement.
* **Shift for exploring** — Shifting the tie-up left/right or up/down is a great way to explore variations of a pattern without redesigning it.
* **Wrap vs. no-wrap** — By default, shifts wrap around. Hold Shift when clicking to prevent wrapping — useful when you want to move the pattern without duplicating cells.
***
### Quick Reference
| Operation | What It Does |
| ---------------- | -------------------------------------------- |
| Clear | Remove all connections |
| Change Face | Toggle every cell (filled ↔ empty) |
| Invert | Flip vertically (top ↔ bottom) |
| Reverse | Flip horizontally (left ↔ right) |
| Rotate 90 | Rotate clockwise (requires square selection) |
| Rotate 180 | Rotate 180° |
| Shift Right/Left | Move columns with wrapping |
| Shift Up/Down | Move rows with wrapping |
| Diagonal | Generate a stepped diagonal pattern |


 |
|  |
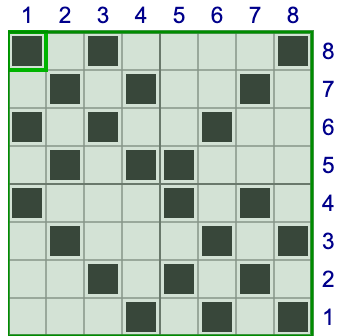
#### Invert & Reverse
**Invert** Flips the tie-up vertically (top to bottom). The top row moves to the bottom and the bottom row moves to the top. This reverses the shaft order within the tie-up — shaft 1's connections swap with the highest shaft, shaft 2 with the next highest, and so on.
\
**Reverse** Flips the tie-up horizontally (left to right). The leftmost treadle column moves to the right and vice versa. This reverses the treadle order.
| Original Selection | After Invert | After Reverse |
| ---------------------------------------------------------------------------------------------------------------------------------------------------------------------------------------------------------------------------------------------------------- | ---------------------------------------------------------------------------------------------------------------------------------------------------------------------------------------------------------------------------------------------------------- | ---------------------------------------------------------------------------------------------------------------------------------------------------------------------------------------------------------------------------------------------------------- |
|
|
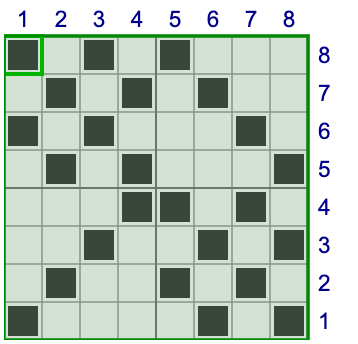
#### Invert & Reverse
**Invert** Flips the tie-up vertically (top to bottom). The top row moves to the bottom and the bottom row moves to the top. This reverses the shaft order within the tie-up — shaft 1's connections swap with the highest shaft, shaft 2 with the next highest, and so on.
\
**Reverse** Flips the tie-up horizontally (left to right). The leftmost treadle column moves to the right and vice versa. This reverses the treadle order.
| Original Selection | After Invert | After Reverse |
| ---------------------------------------------------------------------------------------------------------------------------------------------------------------------------------------------------------------------------------------------------------- | ---------------------------------------------------------------------------------------------------------------------------------------------------------------------------------------------------------------------------------------------------------- | ---------------------------------------------------------------------------------------------------------------------------------------------------------------------------------------------------------------------------------------------------------- |
|  |
|  |
|  |
| | | |
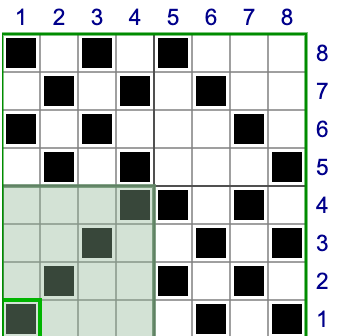
#### Rotate 90 and 180
**Rotate 90** rotates the tie-up 90° clockwise. This requires a square selection (same number of shafts and treadles in the selection). If the tie-up isn't square, select a square region first.
**Rotate 180** rotates the tie-up 180° — equivalent to applying both Invert and Reverse. Every cell moves to the diagonally opposite position.
| Original Selection | After Rotate 90 |
| ---------------------------------------------------------------------------------------------------------------------------------------------------------------------------------------------------------------------------------------------------------- | ---------------------------------------------------------------------------------------------------------------------------------------------------------------------------------------------------------------------------------------------------------- |
|
|
| | | |
#### Rotate 90 and 180
**Rotate 90** rotates the tie-up 90° clockwise. This requires a square selection (same number of shafts and treadles in the selection). If the tie-up isn't square, select a square region first.
**Rotate 180** rotates the tie-up 180° — equivalent to applying both Invert and Reverse. Every cell moves to the diagonally opposite position.
| Original Selection | After Rotate 90 |
| ---------------------------------------------------------------------------------------------------------------------------------------------------------------------------------------------------------------------------------------------------------- | ---------------------------------------------------------------------------------------------------------------------------------------------------------------------------------------------------------------------------------------------------------- |
|  |
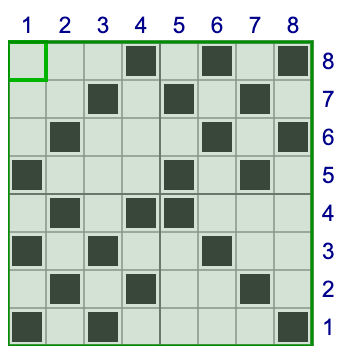
#### Shift Right / Shift Left
Moves all tie-up connections one column to the right or left. Connections that shift off the edge wrap around to the opposite side. Hold Shift when clicking to shift without wrapping (connections at the edge are lost instead).
#### Shift Up / Shift Down
Moves all tie-up connections one row up or down. Connections that shift off the edge wrap around. Hold Shift for no-wrap mode.
| Original Selection | After Shift Right (with wrap) |
| ---------------------------------------------------------------------------------------------------------------------------------------------------------------------------------------------------------------------------------------------------------- | ---------------------------------------------------------------------------------------------------------------------------------------------------------------------------------------------------------------------------------------------------------- |
|
|
#### Shift Right / Shift Left
Moves all tie-up connections one column to the right or left. Connections that shift off the edge wrap around to the opposite side. Hold Shift when clicking to shift without wrapping (connections at the edge are lost instead).
#### Shift Up / Shift Down
Moves all tie-up connections one row up or down. Connections that shift off the edge wrap around. Hold Shift for no-wrap mode.
| Original Selection | After Shift Right (with wrap) |
| ---------------------------------------------------------------------------------------------------------------------------------------------------------------------------------------------------------------------------------------------------------- | ---------------------------------------------------------------------------------------------------------------------------------------------------------------------------------------------------------------------------------------------------------- |
|  |
***
### Diagonal Button
The Diagonal button (separate from the dropdown) generates a stepped diagonal pattern across the tie-up. It opens a dialog with these settings:
**Start** Which treadle to begin the diagonal pattern from.
**Step** How many shafts to step per treadle. A step of 1 creates a simple diagonal (1-2-3-4). A step of 2 skips every other shaft (1-3-5-7).
**Treadles per Cycle** How many treadles make up one complete cycle before the pattern repeats or extends.
**Stop** The last treadle to fill with the diagonal pattern.
**Direction** Step up (shaft numbers increase) or step down (shaft numbers decrease).
If you have a selection in the tie-up, the diagonal is constrained to that shaft range.
***
### Tips
* **Undo works** — Ctrl+Z (Cmd+Z) reverts any tie-up operation.
* **Use with selections** — If you select a region of the tie-up first, operations apply only to that region. This lets you transform part of the tie-up while leaving the rest unchanged.
* **Change Face for the flip side** — Change Face is the quickest way to see what the back of your fabric looks like — it inverts the entire interlacement.
* **Shift for exploring** — Shifting the tie-up left/right or up/down is a great way to explore variations of a pattern without redesigning it.
* **Wrap vs. no-wrap** — By default, shifts wrap around. Hold Shift when clicking to prevent wrapping — useful when you want to move the pattern without duplicating cells.
|
***
### Diagonal Button
The Diagonal button (separate from the dropdown) generates a stepped diagonal pattern across the tie-up. It opens a dialog with these settings:
**Start** Which treadle to begin the diagonal pattern from.
**Step** How many shafts to step per treadle. A step of 1 creates a simple diagonal (1-2-3-4). A step of 2 skips every other shaft (1-3-5-7).
**Treadles per Cycle** How many treadles make up one complete cycle before the pattern repeats or extends.
**Stop** The last treadle to fill with the diagonal pattern.
**Direction** Step up (shaft numbers increase) or step down (shaft numbers decrease).
If you have a selection in the tie-up, the diagonal is constrained to that shaft range.
***
### Tips
* **Undo works** — Ctrl+Z (Cmd+Z) reverts any tie-up operation.
* **Use with selections** — If you select a region of the tie-up first, operations apply only to that region. This lets you transform part of the tie-up while leaving the rest unchanged.
* **Change Face for the flip side** — Change Face is the quickest way to see what the back of your fabric looks like — it inverts the entire interlacement.
* **Shift for exploring** — Shifting the tie-up left/right or up/down is a great way to explore variations of a pattern without redesigning it.
* **Wrap vs. no-wrap** — By default, shifts wrap around. Hold Shift when clicking to prevent wrapping — useful when you want to move the pattern without duplicating cells.
